Bleeds & Guidelines
In printing terminology, the bleed is the extra margin on a print product that is meant to be trimmed off when the product is trimmed to its final size. Bleed basically means that the color and graphics on a product "bleed off the page" to ensure continuity of the color to the edge of your product. For the best results, please download the product templates from our download templates page.
When we print products such as business cards and postcards, we do not print on paper of that size. We gang-run print, which means that we organize several print jobs next to one another on a large sheet of paper, print, and then trim each individual product to its final size. Jobs cannot be trimmed perfectly on the trimming line each time. During the trimming process, a product may be trimmed within or beyond the trimming line. As a result, the product may have a white edge, or a portion of the artwork from the surrounding jobs. Thus, we require a bleed on each individual product so that when the product is trimmed, there is an extra margin to prevent imperfections.
A full bleed is required for all print-ready files*. For the correct bleed for your product, please download and refer to the product templates from our download templates page. Remember to remove all guidelines before submitting your artwork.
* Bleeds may not be be required for many of our large format printing products. Please refer to the template guidelines or product page for more information.
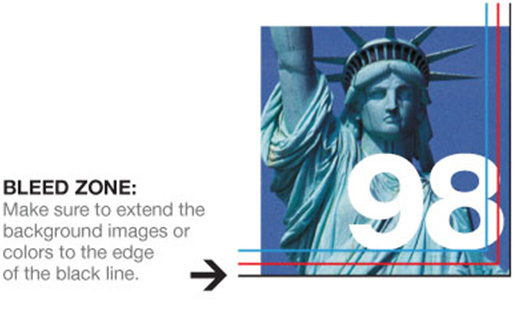
Do not include crop marks in your artwork. Do not include any printers marks. Always submit your artwork at trim size + bleed. An example of bleed setup for a 4" x 6" postcard would be 4.125" x 6.125”. We are not responsible for crop marks or registration printed.
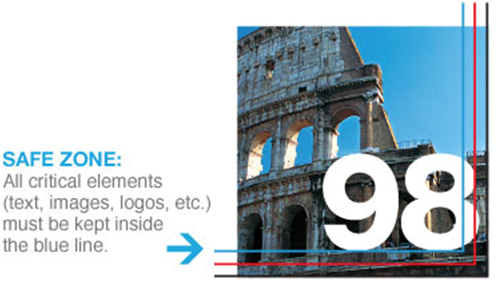
It is helpful to use guidelines in your artwork for print-ready files. Guidelines such as the safe zone, the trimming zone, and the bleed help designate where your product will be trimmed, as well as help you keep important elements such as text and graphics away from the trimming margin. Please provide us with a bleed all around your artwork, and make sure to keep all critical elements such as text and graphics within the Safe Zone. Remember to remove all guidelines before submitting your artwork.

The Safe Zone is the area where all the critical elements (text, images, logos, etc.) must be placed, so that they are not trimmed off when the product is trimmed to the final size. Please make sure to remain within the Safe Zone, as elements on the Safe Zone line may be cut off during trimming. Remember to remove all guidelines before submitting your artwork.
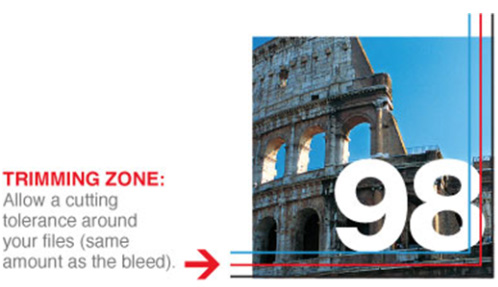
The Trimming Zone, or the trim line, is where the product will be trimmed to its final size. The trim line indicates the final size of the product. Please keep in mind that variations may occur during the trimming process, and we cannot guarantee that your product will be trimmed perfectly along the trim line. Remember to remove all guidelines before submitting your artwork.
Borders are not recommended due to cutting shifts. If your product is not trimmed exactly on the trimming line, borders may appear uneven. Especially for small products such as business cards, even half a millimeter of cutting shift may cause the borders to look uneven. We will not reprint an order with borders of varying widths.
Colors & Color Mode
Color options for pre-press printing are divided into four categories:
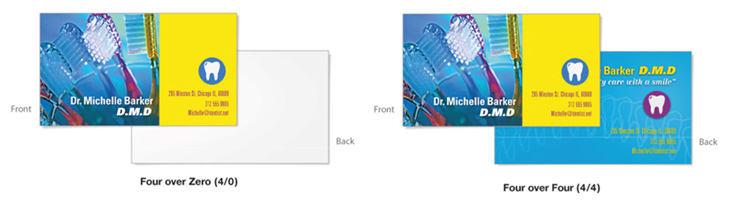
- Full Color Front / Full Color Back, or Four over Four (4/4): Four-color print job with color on both sides of the paper.
- Full Color Front / Blank Back, or Four over Zero (4/0): Four-color print job on the front, and no printing on the back.
You should select the GRACol2006_Coated1v2.icc color profile to ensure your final printed product matches your design.
Due to an industry-wide gang-run limitation, we do not guarantee color - a shift in color may occur. By placing an order with All Links you agree to this limitation. We accept no responsibility for color variations between submitted files and the final printed piece. While we do our best to accurately represent accurate color and texture of the final printed product, please remember that due to color calibration and differences in color between monitors, we cannot guarantee the colors you see on the screen will match the printed product exactly. The actual product may be slightly darker or lighter than what you see on your screen.
Please make sure all files are in CMYK mode. We do not use any spot colors or Pantone colors, and they must be converted to CMYK before uploading through our website. If you use RGB or any other mode aside from CMYK, there will be a color shift. Please start and finish all artwork in CMYK mode. Check your values carefully before submitting any artwork.
Certain colors may look differently on your computer screen, or personal printer (even printers that are in CMYK) compared to when it's printed on our offset presses. We highly recommend using a process color guide to help you choose your colors to lessen the chance of a color shifting. Your print may also vary from printer to printer due to the press model, paper stock, and calibration, inks.
Under no circumstances will a reprint be honored for color variations that have occurred during the printing process.
We require that you provide us with print-ready digital files in CMYK or RGB color mode depending on the product type.
All offset print files should be sent in CMYK. Any files submitted in RGB may experience unacceptable color shifting. All files submitted in RGB are automatically converted to CMYK. Provide all black and white artwork in grayscale color mode. We do not accept any other color mode.
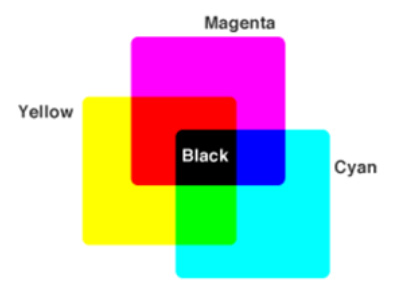
CMYK indicates Cyan, Magenta, Yellow, and Keyline (Black). These 4 colors of ink are used for offset printing. Cyan is a shade of blue found in the 4 primary color printing process. Magenta is a shade of hot pink found in the basic 4 color printing process.
Four color process is a method of printing that uses dots of cyan, magenta, yellow, and black to recreate the continuous tones and to produce a printed image that matches the coloring of the original image.
RGB color mode combines three colors, Red, Green, and Blue. Your computer monitor, scanner, and digital camera all use a combination of these three colors to produce the final colors. Presses, however, require four different colors, CMYK, to produce the final printed material. Thus, RGB must be converted to CMYK for print.
You can convert a file from RGB to CMYK, but cannot convert a file from CMYK to RGB. If you attempt to do so, some of the image data in that file may be lost and become unrecoverable.
Keep in mind that your image may be created in RGB, but it will print in CMYK. RGB color mode may look sharp on your computer screen, however, it will not print as it appears.
Convert RGB files into CMYK in Photoshop by simply clicking on Image > Mode > CMYK.
It is imperative that you convert your files to CMYK, since this is the only color mode that we accept for printing. Any other color mode will not produce optimal printing results. If you send us an RGB file, there is a chance that a color shift may occur and you may not be satisfied with your job.
* You should always start and finish your designs in CMYK color mode.
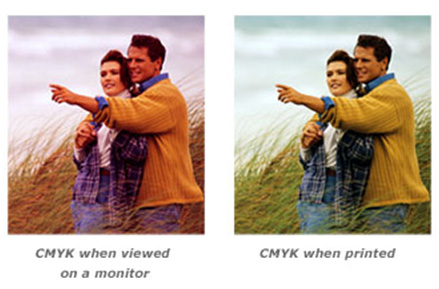
Both CMYK and RGB color scales render colors differently due to the process of mixing colors and how much mixing is needed. Colors need to be converted correctly in order to meet the correct color profile, depending on the medium. Since RGB has a larger scale of available colors, this scale may work better to produce specific colors that are vibrant, depending on the product. In print mediums, RGB colors will not be as vibrant as they appear on-screen. CMYK colors are more accurate on screen and in print because it has a more limited range of possible colors. Both color modes must be properly converted using various design softwares in order to produce true colors. Colors viewed both on screen and in print mediums will vary.
Overprint is used to intentionally overlap inks for a number of reasons. We suggest that you turn all overprint objects off before submitting, for it may cause unexpected results.
A computer monitor represents only one form of black. In print, rich black is an ink mixture of solid black, 100% K, with additional CMY ink values. This results in a darker tone than black ink alone. If you print black alone as 100% K, the resulting black may not be as dark as you might like. Rich black is a darker, deeper black that combines a percentage of all the four CMYK inks.
The values to create rich black are:
C=60, M=40, Y=40, K=100
When using a blue in your design, always make sure to leave at least a 30% difference in your Cyan and Magenta values. Blue is close to purple in the CMYK spectrum. Remember, use a low amount of magenta whenever using high amounts of cyan to avoid purple. Ex: C=100, M=70, Y=0, K=0
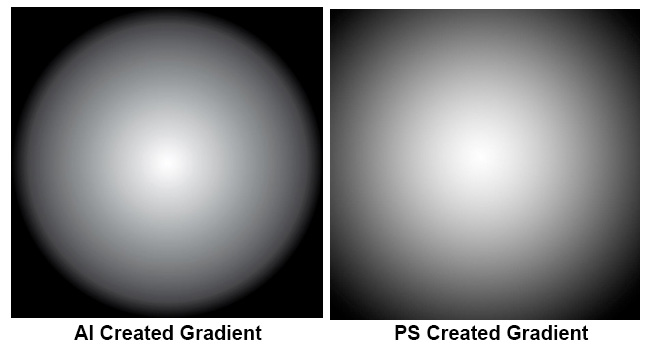
When creating gradients in your artwork, we highly suggest creating those gradients in Photoshop, and not in Illustrator. the reason being, is that Illustrator is a vector based program and doesn't raster the gradient the same way Photoshop does, and it will create "Steps" in the gradient that look like lines in the final print. The only way to cure this is to create the gradients in Photoshop and then either import the gradient into illustrator, or just completely design the artwork within Photoshop. Please see the attached photos, you can see how much smoother the gradient is in the Photoshop image vs the Illustrator image.
An essential part of designing a good print project is staying within the recommended constraints of printing presses and binding equipment. For example, there are specific guidelines for printing a job that has areas of heavy ink coverage because these areas can create problems with ink saturation, such as 'streaking' or with paper, such as 'fluting' and ‘buckling.’
The best way to avoid problems due to heavy coverage is to automatically check all sizable black color areas on supplied images and ad files to make sure that ink coverage is 'within spec' (not too heavy). The measurement used for this is TAC (total area coverage), calculated by adding the percentages of C, M, Y, and K used in an area of color. The generally accepted limit is 280% - at the most.
Oversaturation of black can lead to many complications in your order. It may cause the UV not to be applied well and create your request to become splotchy due to improper drying. To prevent this, we recommend using printers black due to its low saturation but still offer a rich black.
The values to create rich black are:
C=60, M=40, Y=40, K=100
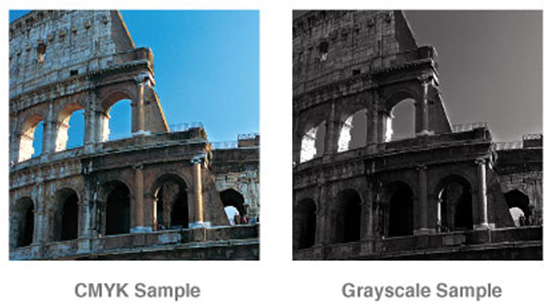
Grayscale color mode, also known as black and white color mode, is composed of two colors: black and white. It is used to reproduce an image with different shades of grey.
If a greyscale image converts to CMYK a shift will occur in the final printed piece. Always check the values of your greyscale images on your final CMYK document. If you have any other color aside from black then a shift may occur.
File Formats & Size
The following formats are acceptable for uploads: TIF, .TIFF, .EPS, .AI, .PSD, .JPG, .PDF. Recommended: To reduce file size, please upload in .jpg format. For all other file formats, ensure all layers are flattened.
.TIF (Tagged Image File) / .TIFF (Tagged Image File Format) - High-quality graphics format that is often used for storing multi-colored images. Supports layers, multiple pages, raster images, vector images, lossy compression, and lossless compression.
.EPS (Encapsulated PostScript) - PostScript file used primarily in the transfer of images to different operating systems.
.AI (Adobe Illustrator file) - Vector graphics file that uses paths connected by points.
.PSD (Photoshop Document) - Image file created by Adobe Photoshop; supports various types of Photoshop image options, including image layers, adjustment layers, etc. We recommend that .PSD files be flattened prior to being uploaded.
.JPG (Image Compression File) - Compressed image format that uses lossy compression; commonly used for storing realistic photos (digital photos), since it is able to compress substantially with minimal loss in image quality.
.PDF (Portable Document Format) - The most preferred file format to be set in pre-press quality. Ideal for viewing on multiple computers, because it preserves the formatting, fonts, and other elements within the document on different computers, as well as when it is printed.
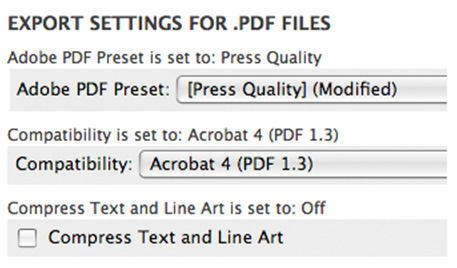
When exporting from any program such as Indesign or Illustrator, use these settings to make sure your .PDF files export correctly. NOTE: Due to Adobe limitations, this preset will not convert all colors into CMYK. You must convert all colors to CMYK before saving your file.
Maximum file size for uploads: 75MB (megabytes) per file. Before uploading your file, make sure to check the image size. In Photoshop, click on Image > Image Size, and proportion your image correctly. Recommended: To reduce file size, please upload in .jpg format. For all other file formats, ensure all layers are flattened.
Raster-based artwork such as photos or flattened artwork (from Adobe Photoshop) are made up of tiny squares (pixels), and depending on your resolution and/or final output size desired, the file could have a low quality end result. Any raster elements you wish to use should have a high enough resolution (DPI) before considering them for your large format product.
Vector-based artwork such as illustrations or clip-art style elements (from Adobe Illustrator) is made with mathematical calculations, and can be scaled up to any size without losing quality. Keep in mind that any effects used in Adobe Illustrator are raster-based and have transparency: this greatly adds to file size and you must have correct settings in your "Document Raster Effects Settings" to ensure best output for these effects. If you are doing a photo-quality print on a 36" x 48" poster, and leave the raster effects settings at default 72 DPI - you may see tiny squares in your drop shadows, as opposed to a smooth shadow.
Typefaces & Fonts
Embedding a font means storing your font information in the file so that when your file is opened on a different computer, the fonts do not vary in appearance. If your fonts are not embedded, a different font may be substituted for your document. To prevent these variations, embed all your fonts in PDF files.
Please follow the following steps before you submit your files.
- Fonts must be embedded in PDF files. (Some fonts have copyright restrictions and will not embed in PDF Files.)
- Embed all images and outline text in Illustrator files.
- Quark Express: Fonts and images must be included with all files submitted. (Mac only)
- Flatten all layers when working in Photoshop.
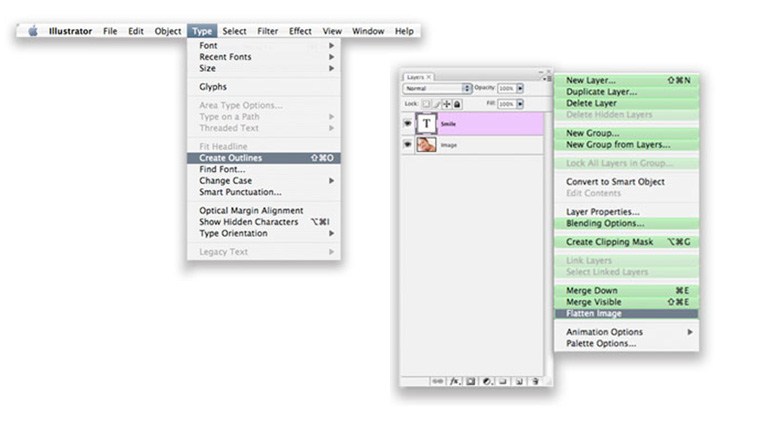
When creating a file with a vector-based software such as Illustrator, follow these steps to outline fonts:
- Select "Type"
- Select "Create Outlines"
When trying to outline fonts in Photoshop, simply just flatten the image.
Resolution
Resolution is also known as DPI (dots per inch) or ppi (pixels per inch). It indicates the number of colored dots or pixels that make up one image. The higher the dots per inch/pixels per inch, the greater the resolution and the clearer the resulting final print will be
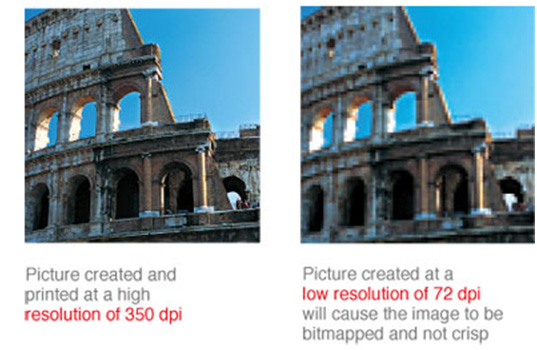
In order for an image to print correctly, all file formats must be submitted at a resolution of 350 DPI. When file resolution is lower than 350 DPI, the final print will have a substantial drop in the image quality. For signage, please submit files with a resolution of 150 DPI.
Low resolution files may be printed as is or will be placed on hold until we receive new files, slowing your turn-around.
A resolution of 350 DPI means 350 dots per every inch in the design.
High-quality images can be obtained from:
- High-resolution stock photography
- High-quality scanned images
- Digital cameras with a high quality of 2.4 mega pixels or more Remember - DO NOT take any images from the Internet, because most images you will find on the web are protected by copyright laws, and these images are not high resolution
Monitor resolution is much lower than the resolution of printers, so just because an image looks sharp on the screen, doesn't mean it will print well.
If purchasing an image from a royalty-free website, please make sure that you choose a high-resolution image of 350 DPI.
Your original file needs to be created at a resolution of 350 DPI (150 DPI for large format print files). If a file is created at a low resolution and manually changed to a higher resolution, it will not change the quality of the image. The only difference it would make is that the file would be rescaled, and the density of the pixels or dots would change, not the number of dots or pixels in the file.
When you take a picture from a digital camera, it must be set at a high resolution in order to result in 350 DPI. We recommend you do this because you cannot change the resolution of a picture after it has been taken. Whenever you change the dimensions of an image or picture, the resolution changes also. The more you reduce the dimensions of a picture, the higher its resolution becomes. For this reason, we ask that you make sure that you save the picture at 350 DPI. Image resolutions can change if the image is resized or scaled in the page layout application, or if the image is resized or scaled when the file is converted to the PDF format.
Perfect Binding
For products that will be perfect bound, we do not recommend crossover images and/or copy, as these elements may be lost in the gutter and may not line up after binding.
File Orientation
For vertical files, the top of the front file will be printed back to back with the top of the back file.

In the example above, the front side and back side will be printed back to back
For horizontal files, the right side of the front file will be printed back to back with the left side of the back file.

In the example above, the photo (Front Side) and the tooth logo (Back Side) will be printed back to back.
Folding Requirements
All folds are standard with our brochures and no custom folds are allowed. Please compensate for a shift that may occur during the folding process (up to an 1/8”).
All artwork should be within the safe area between each panel that is folded. Artwork that is exactly lining up against these fold lines is not recommended due to this limitation. When creating something like a greeting card or folded business card, remember to check the orientation before submitting it. We highly recommend referring to our template guidelines to see the direction of each panel.
For more complicated orders like vertical brochures and any custom orders that have a more complicated orientation, we do ask that you call customer service for further help. Templates are available on our website. Remember to remove all guidelines before submitting your artwork.
Specialty Paper, Coating & Add-On Options
Orders on silk lamination will tend to cause artwork to be slightly darker or greyer, so we do advise orders placed on silk to be lightened (about 10% to 15%) before submitting. However, there is no guarantee that your colors will turn out correctly. Some color shift is to be expected due to gang-run limitations.
When designing plastic cards, it is important to keep in mind that the frosted and clear plastic cards are transparent. The clear cards are completely transparent. The frosted cards are semi-transparent and cannot be seen through easily. The opaque white plastic cardsare solid white and not transparent at all. Keep this in mind when designing your plastic cards, it will affect how your design will print.
Printing on Clear and Frosted Plastic Cards will come out slightly lighter than average compared to other stocks. This is due to the plastic itself and is not a production issue.
When setting up a rich black value, please make sure to use C 60 M 40 Y 40 K 100 values. Do not use all 100 since it will cause problems and will not print any darker on plastic.
Since there is no white ink in CMYK, it is important to keep in mind that the frosted and clear plastic cards are transparent. The three designs above are the same as in the first picture. You will notice that the white area in the clear cards (right) and the frosted cards (center) has no ink and will show the transparent material it's printed on. In this case, the clear cards and frosted cards white area show up with no ink on the printed piece. Also, keep in mind that all colors that are printed on clear cards or frosted cards will be transparent as well.
With the clear plastic cards, there might be a small percentage that may have light scratches. This issue originates from the manufacturer and is due to the material and handling. To help compensate for this, we run over of the clear plastic cards to help meet the required quantity.
Clear plastic cards will come with a thin protective layer on one side that can be peeled off. This is to prevent the cards from scratching during packaging and shipping.
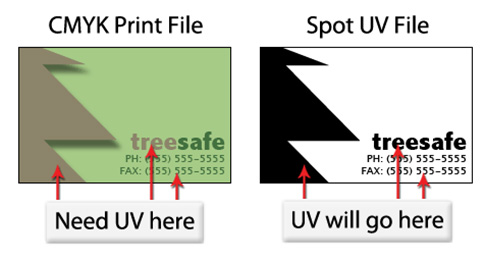
When creating a Spot UV job, You must include a Spot UV mask file along with the regular full color file. The Spot UV mask file is used to show where the UV will be placed. This file must be 100% black (no other colors, gradients, or shading) and white. The black will represent where the UV mask will be, almost like a template over your artwork. Anywhere with white will not have UV.
Use 100% K to indicate where you would like the UV. White will indicate no UV.
When Using Multiple Add On Services (Embossing, UV, Foiling): We do not recommend using multiple services that put too much stress on the paper. When combining two or three of these services, certain imperfections may appear due to this stress. Foiling may flake, embossing may not show up as bright, and the UV may crack. Please be aware of this when creating your artwork.
When creating a foil mask or embossing mask, you must create a separate file along with your regular artwork. This file must be at 100% black (no other colors, gradients, or shading) and white. The black will represent where the foil or embossing will be placed, almost like a template over your artwork. Anywhere white will not be foiled or embossed. Embossing is done only on the front side of the paper and can not be done on both and is limited to specific paper stock.
Use 100% K to indicate where you would like the foiling or embossing. White will indicate no foiling or embossing.
All Foiling and embossing are done "blind" meaning after the cut so that it may shift up to 1/8th of an inch. Please compensate for this on your artwork and keep art simple. Do not align artwork against or under the embossing or foiling due to this shift. All embossing and foiling must be 5mm inside the trim line and can not bleed over the edges. Avoid using thin fonts and thin lines. Foiling and embossing is a delicate process, and due to the limitations, certain point sizes may not register (Recommended minimum 10pts or above depending on font). If you have to foil with UV, please keep the foil 1/8" from any UV. If UV is placed under any of the foilings it will tend to flake off so, please check your artwork carefully
When Using Multiple Add On Services (Embossing, UV, Foiling): We do not recommend using multiple services that put too much stress on the paper. When combining two or three of these services, certain imperfections may appear due to this stress. Foiling may flake, embossing may not show up as bright, and the UV may crack. Please be aware of this when creating your artwork.
When creating a White Ink job, You must include a White Ink template file (Mask File) along with the regular full color file. The White Ink template file (Mask File) is used to show where the White Ink will be placed.
Note: White Mask File must be made in vector format and be saved as EPS or PDF format.
To setup your mask file (White Ink) we need it to be represented in a 100% black and white format. Black will represent where the finishing will be placed in relevance to the print size while the white will remain untouched. The rest of the area will be represent transparency.

If you would like White Ink in these CMYK areas

Make a 100% Black & White (and Name as Mask File) 100% Black representing WHITE INK Areas
File Submission
Once files are submitted they can move quickly into production. Once files are in production they cannot be removed; the order may not be canceled; no changes can be made. It is very important that this is understood. If artwork is submitted incorrectly, it will print incorrectly. If a bad quality file is submitted, it will be a bad quality print. We do everything we can to assist you, but it's not always possible to catch potential problems before the artwork moves forward for print.
The thumbprint you see of your artwork on the invoice is not for actual color. The thumbprint shows color break only.
All Links will no longer check for low resolution artwork. This is now the customer's responsibility to make sure that resolution is 300 DPI and up. This includes individual photos and logos.
All Links, without prior notice, will convert all submitted files that are RGB, PMS and Spot Colors to CMYK. We will not take responsibility for any color change.
No. We do not offer printed proof.
Yes, please use this checklist before you submit your artwork:
- All content (text & graphics) is Complete, Spell-checked, Grammar-checked, and Error-Free
- All important content (text & graphics) is within Safe Zone
- Outline all Text / Fonts
- Embed Image
- Flatten all Photoshop Layers / Objects / Gradients / Swatches / Symbols / Special Effects / Transparencies
- Convert to CMYK Mode
- Correct Resolution (offset/digital/in-house print: 350 DPI, large format: 150 DPI)
- Correct Dimension
- Correct Orientation
- Convert Spot or PMS Color to CMYK
- Turn Off Overprint
- Remove ICC profile
- Make sure files have Bleeds (when required)
- Remove all Crop Marks and Template Guidelines from artwork
- Ink Coverage no more than 250% on solid area
All Links will not honor a re-print of any order or refund the cost due to artwork that was submitted incorrectly.
No. We are now specifically set up to process one side at a time, and this requires that each side of a job must be on a separate file. Not separating files will cause delays and you might have to send the files again. Remember to separate the pages of your .pdf files as well.
Ex: For front and back full color printing, you will need to submit TWO (2) files - 1 Front file, 1 Back file.
File Production
Turnaround times are indicated in the product page. There are different turnaround times for different products. Turnaround times are estimated time of completion and are not guaranteed. Actual completion date could be before or after the estimated turnaround time period.
We start counting the turnaround time when we send your order to press (after we receive your artwork approval and full payment of invoice). Orders sent to press after 12pm Pacific Standard Time will begin counting turnaround time the next business day. Allow additional business days for delivery based on the shipping method you selected. Business days are Monday through Friday. Holidays, Saturdays and Sundays do not count when calculating turnaround.
Turnaround does not begin until acceptable artwork has been provided. Please note that if we are unable to print your files because they do not conform to our file requirements, your job status will return to "A certain exception" and your turnaround time will be reset within our internal system.
All Links assumes no responsibility for delays caused by delivery carriers or any damages resulting from the failure to receive a job on time. Our expected delivery date is not guaranteed. Your order may arrive late due to unforeseen delays in delivery service, the breakdown of equipment, illness, etc.
If we find that a product does not pass a quality inspections we will enter the artwork back in for a reprint at our discretion. No notification will be automatically sent out informing the customer of this. We will do what we can to have the reprint completed and shipped in a timely manner.
Due to the nature of gang-run offset printing, quantities are not exact. There will be over runs or under runs. Over runs or under runs not to exceed 10% on quantities ordered up to 10,000 copies and / or the percentage agreed over or under quantities ordered above 10,000 copies shall constitute acceptable delivery. Printer will bill for actual quantity delivered within this tolerance. If customer requires guaranteed “no less than” delivery, percentage tolerance of coverage must be doubled or above.
There can be variations in materials, including paper, ink, coating, shipping supplies as well as slight variations in finish size up to 0.125”
Cracking of the edges of a business card sometimes occurs when the card contains high values of ink, as in dark colors. This usually happens on a small amount of cards in the run. To prevent this, use lighter colors or if you must use dark colors, use as little ink as possible.
When a job is coated with UV then scored and folded the job may begin to crack. During use, the cracks will become bigger and the ink may start to chip off. Cracking is normal when coated jobs are scored and folded. Ordering the job without UV will help but may not prevent this. As the job is used and folded more and more, cracking will eventually happen.
Due to an industry-wide gang-run limitation, we do not guarantee color reproduction - a shift in color may occur. By placing an order with All Links you agree to this limitation. We accept no responsibility for color variations between submitted files and the final printed piece. While we do our best to accurately represent accurate color and texture of the final printed product, please remember that due to color calibration and differences in color between monitors, we cannot guarantee the colors you see on the screen will match the printed product exactly. The actual product may be slightly darker or lighter than what you see on your screen.
Please make sure all files are in CMYK mode. We do not use any spot colors or Pantone colors, and they must be converted to CMYK before uploading through our website. If you use RGB or any other mode aside from CMYK, there will be a color shift. Please start and finish all artwork in CMYK mode. Check your values carefully before submitting any artwork.
Certain colors may look differently on your computer screen, or personal printer (even printers that are in CMYK) compared to when it's printed on our offset presses. We highly recommend using a process color guide to help you choose your colors to lessen the chance of a color shifting. Your print may also vary from printer to printer due to the press model, paper stock, and calibration, inks.
Under no circumstances will a reprint be honored for color variations that have occurred during the printing process.
Quantities cannot be split up due to gang-run printing. Ex: If you want to order 1000 business cards and split it up 500 under one name and 500 under another name, that cannot be done. If you need two names, you will have to place two orders of 500 each.
Payment
No. All orders require full payment (including shipping and handling) prior to being processed. We accept PayPal, check, credit card (Visa, MasterCard), Chase QuickPay or Zelle. We will not proceed with your order until full payment is received. Please note: All checks must be cashed before the order can be processed.